.png?w=970&h=250)
Stitch Density Explained: How It Affects Your Order's Cost, Durability, and Look
What It Really Means
.jpeg?w=1200&h=896)
What Stitch Density Actually Means for Your Order
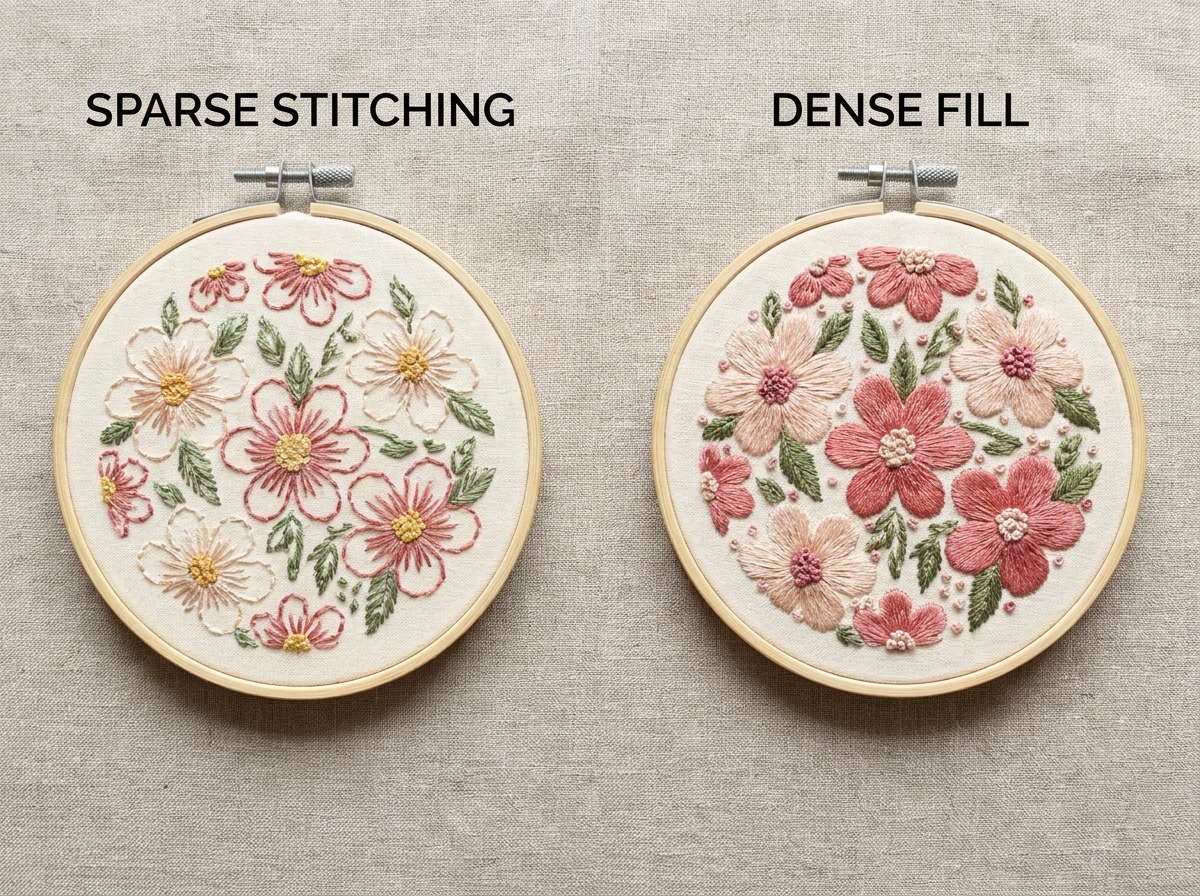
Stitch density is the distance between rows of fill stitches, measured in millimetres. A density of 0.40mm means each row sits 0.40mm from the next. Lower numbers mean tighter stitching. Higher numbers mean looser stitching. Most embroidery on woven fabric runs between 0.35mm and 0.45mm.
That's the technical definition. Here's what it means for your order: stitch density controls how the finished design looks, how long it holds up, and how much it costs you per yard. Get it wrong and you'll see one of two outcomes. Too low and the base fabric shows through, the design looks thin and cheap. Too high and the embroidery becomes stiff, puckered, and prone to cracking when the garment is folded or stretched.
I've watched buyers focus on thread colour, design complexity, and fabric weight while completely overlooking density. Then they wonder why the sample looks different from the mockup, or why the second batch doesn't match the first. Density is the variable that ties all of those together. It's the one parameter that, if set wrong, makes everything else irrelevant.
How Density Drives Cost — The Thread Consumption Equation
Every stitch uses thread. More stitches per square centimetre means more thread per meter of fabric. This isn't a marginal difference. Increasing density from 0.45mm to 0.35mm on the same design can raise thread consumption by 10 to 15 percent. On a 10,000-yard order, that adds up fast.
Let me give you a concrete example. Say you're ordering a floral embroidery on cotton mesh. At 0.45mm density, the design uses roughly 28,000 stitches per 15cm patch. Drop that to 0.35mm and you're looking at 36,000 stitches. That's nearly 30% more thread for the same visual area. Your supplier's per-yard price reflects this, whether they break it out as a line item or bury it in the total. If you want to understand the full picture of what drives embroidery pricing, see our guide on what determines embroidery fabric price.
Then there's machine time. Our 27 machines each run 62 heads simultaneously. At standard density, one machine produces approximately 370 meters per day. Increase density by 20% and that number drops proportionally. For rush orders, this means either longer lead times or fewer machines allocated to your job. Both affect your bottom line.
The tricky part is that the sweet spot depends on fabric type, thread weight, and the garment's end use. A heavy denim jacket can handle 0.45mm because the stiff fabric supports the stitching. A flowing chiffon dress needs lighter density or the embroidery will kill the drape. There's no universal "right" number, but there is always a range that balances appearance, durability, and cost for your specific application.
When Density Goes Wrong — Puckering, Breaks, and Cracking
The most common defect I see from density problems is puckering. When the stitch rows are too tight, they pull the base fabric inward. The embroidered area contracts while the surrounding fabric stays flat, creating a wrinkled, distorted look. It's especially visible on lightweight fabrics like silks, chiffons, and fine cottons.
Puckering gets worse after washing. Our testing shows shrinkage stays under 3% across all embroidery types, but that's measured on properly digitized files with density set correctly. If the density is set too high from the start, washing amplifies the distortion. The embroidery area shrinks more than the surrounding fabric, and the puckering becomes permanent. Buyers who skip the wash test on samples often discover this problem only after the full order arrives. Industry testing standards like AATCC test methods specify how to measure shrinkage and color fastness so results are comparable across suppliers.
Thread breakage is another warning sign. When density is excessive, the needle has to punch through layers of existing thread with every stroke. This creates friction, heat, and mechanical stress. The result: broken threads, skipped stitches, and visible repair marks where the operator re-threaded mid-design. At our factory, we track break rates and target 1 to 3 breaks per 10,000 stitches. When that number climbs, density is usually the first parameter we check.
Over-dense embroidery also becomes rigid, almost like a hard pad sewn onto the fabric. Fold the garment, and the embroidery cracks along the fold line. Stretch it, and the threads snap. This is a particular risk for garments that need to move with the body: activewear, swimwear, children's clothing. The embroidery needs enough density to look full, but not so much that it turns into armour.
Our defect rate stays below 2% across all production. That number comes from controlling density during digitizing, not from sorting out problems after the fact. Once a file goes to the machine with the wrong density setting, you're fighting physics. Prevention is cheaper than correction, every time. For a full breakdown of how we control quality from raw material to packing, see our inspection system overview.
Density Recommendations by Fabric Type
Different fabrics handle density differently. A setting that works perfectly on cotton will pucker on mesh and crack on leather. Here's what we use as starting points, adjusted based on the specific design and thread weight:
| Fabric Type | Recommended Density | Why |
|---|---|---|
| Cotton, linen, woven | 0.40mm | Standard baseline; stable structure supports even stitching |
| Thick cotton, canvas, denim | 0.45–0.50mm | Heavy fabric doesn't compress; lighter density prevents stiffness |
| Knit, jersey | 0.40mm with strong underlay | Stretch fabric needs stabilization; underlay prevents distortion |
| Fleece | 0.50–0.60mm | Pile surface adds visual density; lighter stitching prevents matting |
| Mesh and net | 0.40mm | Open structure requires careful tension; too dense tears the ground. See our mesh vs crochet vs chemical lace comparison |
| Towel, terry cloth | 0.40mm with WSS topping | Water-soluble topping levels the pile for clean stitching. Learn more about water-soluble embroidery production |
| Leather, vinyl | 0.50–0.60mm | Non-compressible material; holes are permanent, so fewer is better |
These are starting points, not final answers. The design itself matters. A small monogram can run denser than a large filled area because it covers less surface. Thread weight changes the equation too. A 40-weight polyester fills gaps more efficiently than a 60-weight rayon, so you can use slightly lighter density and still get full coverage. The thread colour also plays a role — lighter threads on dark fabric need slightly higher density to achieve the same visual coverage as dark threads on light fabric.
The key is that your digitizer should be adjusting density for the specific fabric and thread combination, not using a one-size-fits-all setting. At Fominte, our 10-person design team reviews every file before production. About 15% of incoming digitized files get sent back for density adjustment — not because the design is wrong, but because the density doesn't match the fabric. The relationship between fabric structure and stitch behavior is well documented in textile testing standards references.
How to Write Density Into Your Purchase Order
Most purchase orders I see say something like "embroidery as per approved sample." That works if your sample is perfect and your supplier is consistent. It fails when either condition isn't met.
Here's what I recommend instead. Specify these items in your PO:
Density range. Don't ask for an exact number. Give a range. "0.38–0.42mm for fill areas" gives the digitizer room to optimize while keeping you within your quality window. If you're ordering multiple fabric types, specify density per fabric.
Fabric and thread weight. Density without fabric context is meaningless. "0.40mm on 120gsm cotton mesh with 40-weight polyester" tells your supplier exactly what you need. Without this, they'll guess, and their guess might not match your sample.
Critical areas. If certain parts of the design need different density, call those out explicitly. Lighter fill around a neckline for drape, reinforced density on a pocket flap for durability, tighter stitching on a collar that gets washed frequently. Don't assume the digitizer will read your mind.
I've seen orders go sideways because the buyer assumed the factory would "just know" what density to use. The factory assumed the buyer didn't care. Both were wrong, and the result was 5,000 meters of puckered embroidery that nobody wanted to accept.
The digitizing file is the blueprint. If the blueprint is wrong, no amount of skilled machine operation can fix it. That's not my line. It's what our chief embroidery technician says after 30 years of watching files go through production. He's right. The density setting in the digitizing file determines 80% of your quality outcome. Machine tension, needle selection, and thread quality matter, but they're working within the constraints the file sets.
FAQ
What is the standard stitch density for embroidery on cotton?
The standard density for embroidery on cotton and other woven fabrics is 0.40mm between stitch rows. This provides full coverage without excessive stiffness. For heavier cottons like canvas or denim, 0.45 to 0.50mm works better because the fabric itself is thicker and doesn't compress under the stitching.
How does stitch density affect embroidery cost?
Higher density means more thread per meter and longer machine run time. Increasing density from 0.45mm to 0.35mm can raise thread consumption by 10–15% and reduce daily machine output proportionally. On large orders, this difference is significant enough to affect per-yard pricing.
What happens if stitch density is too high?
Excessive density causes several problems. The fabric puckers as the embroidery area contracts. Thread breakage increases because the needle passes through too many existing stitches. The finished design becomes stiff and prone to cracking when folded or stretched. On lightweight fabrics, over-dense embroidery can also cause the base fabric to tear around the stitched area.
How do I specify density requirements when ordering embroidery fabric?
Include these items in your purchase order: a density range (e.g., 0.38–0.42mm), the fabric type and thread weight, and any areas that need different density from the standard. This gives your supplier's digitizing team clear parameters and prevents inconsistent results across batches. If you have an approved sample, send it along with the PO and note the density range that produced the result you want.
Does stitch density affect how long embroidery lasts?
Yes. Properly set density produces embroidery that holds up through repeated washing and wear. Under-dense embroidery frays and loses coverage over time. Over-dense embroidery cracks and causes fabric stress. The right density for your fabric type ensures the design stays intact for the life of the garment.
How Fominte Controls Density Across 300,000 Meters a Month
With 27 machines running 62 heads each, consistency isn't automatic. It's built into the process. Every digitized file goes through our design team before it reaches the production floor. They check density settings against the target fabric, adjust for thread weight, and flag files that fall outside acceptable ranges. About 15% of files get sent back for correction before they ever touch a machine.
During production, we run first-article inspections on 3 to 5 pieces before committing to the full batch. This is where density problems show up first. If the sample puckers, we know the file needs adjustment before we've wasted material on a 10,000-yard run. That early catch saves both material and time.
Our needle inspection machine checks 100% of output for stitching defects. Break rates are monitored in real time. When they climb above 3 per 10,000 stitches, production pauses to check tension and density settings. This keeps our defect rate below 2% across all embroidery types. We also test against international quality standards for color fastness, shrinkage, and tensile strength. You can read more about what those testing standards mean for your order.
The result: when you order 50,000 meters of embroidery from us, the first meter and the last meter meet the same density specification. That's not luck. It's the combination of proper digitizing, calibrated equipment, and inspection at every stage.
If you're placing a bulk embroidery order and want to discuss density specifications for your specific fabric and design, send your requirements to info@fominte.com. Our design team will review your digitized files, recommend optimal density settings for your fabric and end use, and provide a sample run before committing to full production. Getting density right at the start saves time, material, and headaches down the line.
Step-by-Step Guide
Specify density range in your PO
Include fabric and thread weight
Mark critical density zones
Request first-article inspection
When to Use & Avoid
Cotton woven garments (shirts, dresses)
✅ Use When
- Standard 0.40mm density, moderate underlay, 40-weight thread
⚠️ Avoid When
- Fleece or pile fabrics where standard density would mat the surface
Knit and jersey fabrics
✅ Use When
- 0.40mm with strong cut-away underlay to prevent stretch distortion
⚠️ Avoid When
- Leather or vinyl where standard density creates too many needle holes
Fleece and pile fabrics
✅ Use When
- 0.50-0.60mm lighter density because pile adds visual fullness
⚠️ Avoid When
- Silk or chiffon where this density would be far too heavy
Structured garments (caps, jackets)
✅ Use When
- 0.40mm with reinforced underlay for stability
⚠️ Avoid When
- Flowing garments (scarves, kaftans) where density kills drape
Activewear and swimwear
✅ Use When
- Balanced density that allows stretch without cracking
⚠️ Avoid When
- Rigid applications where stiffness is acceptable
Comparison
| Fabric Type | Recommended Density | Why | Key Consideration |
| Cotton, linen, woven | 0.40mm | Standard baseline, stable structure supports even stitching | Most reliable starting point for new designs |
| Thick cotton, canvas, denim | 0.45-0.50mm | Heavy fabric does not compress, lighter density prevents stiffness | Test on actual fabric weight |
| Knit, jersey | 0.40mm with strong underlay | Stretch fabric needs stabilization to prevent distortion | Underlay is critical, not optional |
| Fleece | 0.50-0.60mm | Pile surface adds visual density, lighter stitching prevents matting | Test on actual fleece, not cotton substitute |
| Mesh and net | 0.40mm | Open structure requires careful tension control | Too dense tears the ground fabric |
| Towel, terry cloth | 0.40mm with WSS topping | Water-soluble topping levels the pile for clean stitching | WSS removal must be complete |
| Leather, vinyl | 0.50-0.60mm | Non-compressible material, needle holes are permanent | Every stitch is permanent, minimize needle penetration |
⚡ Common Mistakes to Avoid
Everything You Need to Know
Conclusion